Search This Blog

Wednesday, April 25, 2007

Sloped Floors and Roofs in Revit - A Great Addition

The Revit Development Team put in a last minute addition to Revit Architecture 2008. It did not show up in any of the Beta’s, nor has it been mentioned in any of the marketing, but it is one of the better enhancements to the program. Have you ever tried to create a sloped floor or a flat roof with slopes? What a pain it used to be. Now in 2008 it is a breeze. This works both on floors and roofs (with no defining edges.)

Place a floor or roof as you normally do. Once the floor or roof is drawn, if you reselect it, you will see a new set of tools on the Option Bar. These tools were taken from the Revit Structure program. In Revit Structure they use these tools on slabs. Now thanks to this last minute add, we can use them on floors and roofs.


When selecting the first one, Modify Sub-Elements, you will see a green line outlining your floor or roof, and green grips on each corner. You can move the entire edge or individual corners up or down. You can also create warped slabs by moving corners in opposite directions.


The second button, Draw Points, will allow you to assign a spot grade at any point. You also use the Draw Split Lines button to split the surface of your floor or roof into multiple surfaces. This does not make your floor or roof into two elements, it just divides the surface.

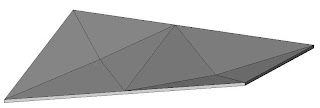
These tools are great, but I can already think of two additions that would make it even better. I would like a way to type in a slope angle or percentage. I would also want to be able to label the spot points with a tag that would call out the elevation. Currently these options are not available. Put these on your wish list. I guess they have to leave something for the next release.

Friday, April 13, 2007

Happy Anniversary

It's hard to believe that it has been a year. It was one year ago, that I was convinced by my co-worker, Jason Hickey, to start a blog. Looking back, I feel that it has been successful. I never thought it would take off, but here we are a year later getting 200-500 hits a day. I hope to continue to provide useful information to my AEC readers.

Thank You for reading!

A Dashboard that Might Get Used in 2008

The Dashboard was introduced in AutoCAD 2007. It was a new palette that few people found a use for. It had all kinds of 3D rendering/visualization tools on it, but unless you were working on a rendering, you probably turned it off. I would even go as far as to say that most people probably turned it off the first time they launched 2007 and never turned it back on. I mean, why would you when you already have your favorite toolbars and tool palettes? It was just something that took up valuable screen space.

Let me introduce you to the new and improved 2008 Dashboard. This one might make the cut when users launch 2008 for the first time, if they understand that it is now CUSTOMIZABLE! That's right, it is totally customizable. You can add or delete what you want. You can put all your favorite commands in one spot and completely turn off all those toolbar buttons.

The out of the box dashboard comes with several predefined Control Panels that have various tools on them. If you right click, you can select which ones you want by picking Control Panel and then checking the ones you want on. You can also right click on a panel that is currently on, and select Hide to turn it off.


I would start by browsing through these, turning off the ones you do not like, and leaving the ones you do like. Here is a sample of my favorite ones.

You can also go into the CUI by right clicking on the dashboard and selecting Customize Commands. Once inside the CUI, there is a new category for the Dashboard. Here you can add new panels and simply drag and drop your favorite commands onto the newly created panel.


With these added enhancements to the Dashboard, I can visualize everyone dashing off to customize their dashboard ( I know it's corny, but it could happen!)

Wednesday, April 11, 2007

Hiding Elements in Revit 2008

Yesterday I was asked by one of my customers how to hide individual elements or families in a view. I told him that until he installs Revit 2008, he would have to create a view filter in Visual Graphics and turn the visibility off for that filter. He asked what was different in 2008, so I am going to describe one of the new features here.

Hiding elements in Revit Architecture 2008 has some new features. The temporary hide feature in previous releases was just that-- temporary. When an element was hidden using the
Temporary Hide tool, it would only be for that session. So, when a view with hidden elements was printed, all elements (whether hidden or not) would plot.

Let me introduce you to the
new Persistent Hide tool. This will allow you to hide either individual elements or categories that will remain hidden and not plot. Prior to this tool, we would have to create some sort of view filter to hide elements.

This tool works by selecting the element that you want to hide
in the view, right clicking and picking Hide In View. You can select either Elements or Category.

Once the element is hidden, you can select on the new Reveal Hidden Elements icon (the light bulb) on the View Control Bar at the bottom of the screen. When this is selected, all non-hidden elements will turn gray and you will get a bold magenta outline around your view to indicate that you are in a view hidden elements mode. Your hidden elements will be magenta as well. If you right click on a hidden element, you can select Unhide In View to unhide the element.


You can also turn temporary hidden elements into persistent hidden elements by selecting the element and picking on the Temporary Hide/Isolate icon (the sunglasses) on the View Control Bar. You will see a new option on the menu to Apply Hide/Isolate to View.


With the new Persistent Hide feature you can see what you want, and hide what you don't want to see and plot it that way. Hmmm... it actually works the way you want it to.

Vista Patch for AutoCAD 2007

If you are trying to run AutoCAD 2007 on Windows Vista then listen up. We have been asked this question more times in the past several months than any other-- "How can I get it to work on Vista?"

Autodesk has released SP2 for AutoCAD 2007. Here is the link to download SP2. The only hiccup in the service patch is if you have already installed SP1. Due to a limitation in Service Pack 1, Service Pack 2 cannot be installed on Windows Vista with SP1 already installed. To install SP2, first uninstall and reinstall AutoCAD and then apply SP2 (without installing SP1.)