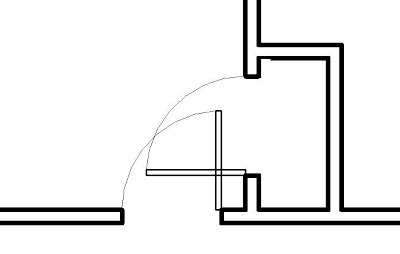
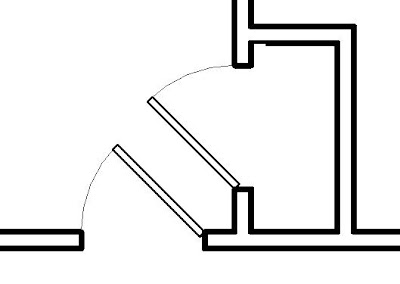
Revit comes with many types of doors that can be used in your projects. You can also download additional types from sites like Revit City and BIM World. Searching through these libraries, I relealized that none of them came with the ability to adjust the swing from 90 degrees to 45 degrees. This is a must in situations as shown below.
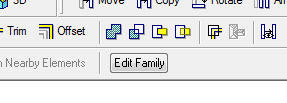
 Modifying the plan swing of doors is a simple process, as long as you understand a few things. You will need to open the door family that you want to modify by highlighting the door in your project and then picking the Edit Family button on the Options bar.
This will open up the door family in a Family Editor mode. You will then need to navigate Project Browser to open the floor plan view of the door.


Modifying the plan swing of doors is a simple process, as long as you understand a few things. You will need to open the door family that you want to modify by highlighting the door in your project and then picking the Edit Family button on the Options bar. This will open up the door family in a Family Editor mode. You will then need to navigate Project Browser to open the floor plan view of the door.
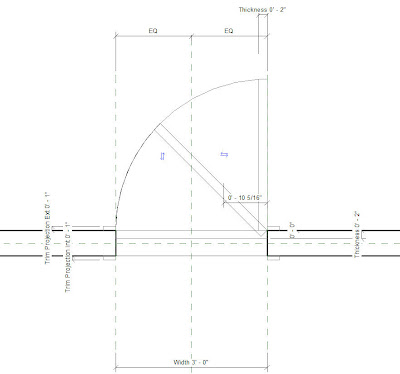
Revit uses Symbolic Lines to represent the swing and the door panel in plan views. The actual 3D door panel is not visible in the plan view because we typically want the door panel to be closed in a 3D view or elevation, and we want the door panel to be open in plan views.
To add additional swing angles, simply copy the existing door panel to the desired swing angle. I used the Rotate command with the Copy Option check so it would rotate and copy the panel in one step. Then you will need to copy the swing arc and trim it with the new door panel.
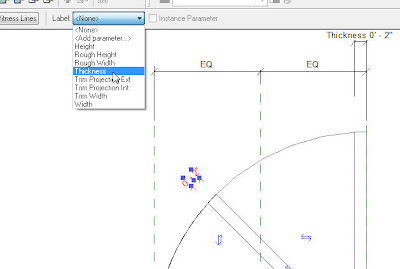
The thickness of the door panel is set to a thickness parameter that users can change. You will need to add a new dimension to the new door panel. Once this dimension is added, assign it to the thickness parameter by using the Label drop down bar on the Options bar.
The last step is to set the visibility parameters to allow one swing to be visible and the other swing to be hidden. To do this, you will need to highlight one panel and the corresponding swing arc. Once highlighted, go into the Properties and select the small box at the end of the Visible check box.
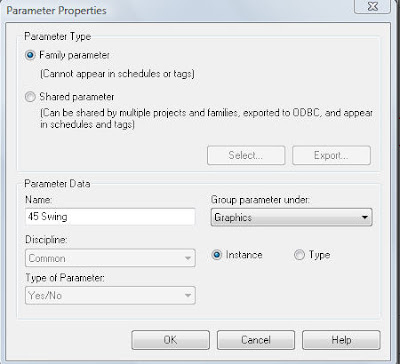
This will allow you to set the visibility to a parameter that users can control inside of their projects. Add a new parameter. Provide a name for the parameter that relates to the swing angle. Make the parameter an instant parameter so users can control this instantly as opposed to by type. Choose the group to place this parameter under. Repeat this process for the other door panel and swing arc. In the end, you should have one door panel and swing arc set to one visibility parameter, and the other door panel and swing arc set to another visibility parameter.
Load this door back into your project or save it to your library. Now when you select this door inside of your project, you will have the ability to check the box to show which swing you want to view. The end result is a plan that does not have doors swinging into each other.
10 comments:
Hi, noob question here:
Is is possible to add an angle parameter for the door swing instead of using preset angles?
Yes.
Use a reference plane to represent the angle (middle of door), add an angle dimension and make it a parameter. Use 2 more dimensions to lock the door lines to the reference plane.
Thanks Troy. That makes perfect sense. But how does that method adjust the swing arc? And do I need to lock the little end (width) lines to the ref plane as well? One more question, is it possible to use a filled region for the door panel instead of lines. I often use a fill here to indicate door type. Thanks again.
which of the door lines I have to lock to the reference plan? With a angle dimension too?
Thanks.
2 Noob questions:
1. I made the door Mikes way, but both swings show up and I have to turn one off everytime I place a door. How o I get one swing to be on and the other off?
2 I tried the adjustable angle door I used equal dimensions to lock the handle side of the door to the reference plane. Swing angle shows up under poperties, but changing the angle does nothing to the door.
Thanks,
Joe
"Anonymous jbushkey said...
2 Noob questions:
1. I made the door Mikes way, but both swings show up and I have to turn one off everytime I place a door. How o I get one swing to be on and the other off?"
Open the family, open up types and then uncheck the door swings you do not want to be turned on......do this for all types
1. Why do we have to draw the door with both swings if we have to turn them off anyway?
2. When I uploaded the new door, it changed all my door swings - which is not what I want. I just need 1 door to change, don't know what I did wrong.
With having the opting of both swings in a single family, you can toggle the swing from 45-90 without having to replace the family with a different family.
If you did not want to change all your doors with the new family, you should of saved the revised door family with a new name prior to loading it back into your project. Then you could of replace the doors you wanted with the new family.
THANK YOU!
I went through the steps again and glad it worked out. I was able to toggle on and off instead of saving since I am using revit in view mode only.
This was a tremendous help for changing my doors over. I often use 45 degree doors for existing doors and 90 degree doors for new doors. In reference to the comments about turning both off, I ended up utilizing the 90 degree as the default on. Then on the existing doors, I individually changed them to 45 (or create similar while creating doors). In any case, thanks.
Post a Comment