Just got my acceptance email notifying me that I will be presenting once again at AU 2010! My proposal was one of 747 that were selected out of 3,100 proposals. Looking forward to AU 2010!
Look for registration to begin in late August, and of course look for my class.
Friday, June 25, 2010


Thursday, May 20, 2010
Webcast of my What's New in Revit MEP 2011
Revit MEP 2011 is loaded with new features. Check it out by watching my recorded webcast.
Enjoy!
What's New in Revit MEP 2011
Enjoy!
What's New in Revit MEP 2011
Monday, May 17, 2010
Using Filters to Hatch Duct in Revit MEP
I was asked today by one of my customers, "What is the easiest way to hatch duct work in Revit MEP to indicate which duct work has been installed on a project." There are several ways this could be accomplished. You could simply use the Filled Region to manually hatch the duct work. This is simple, but is tedious and time consuming.
Method 2 would be to use Phases inside of Revit MEP. You could set up some phases and change the graphics of the phases to indicate the hatching. This is easy enough, but almost an over kill.
The method I ended up recommending is to just use View Filters. You can simply create a new filter and change the graphics of the filter to have the hatch pattern.
I created a short video to share with my customer and thought it might be helpful for others.
Enjoy!
Method 2 would be to use Phases inside of Revit MEP. You could set up some phases and change the graphics of the phases to indicate the hatching. This is easy enough, but almost an over kill.
The method I ended up recommending is to just use View Filters. You can simply create a new filter and change the graphics of the filter to have the hatch pattern.
I created a short video to share with my customer and thought it might be helpful for others.
Enjoy!
Wednesday, May 05, 2010
What's New in Revit Architecture 2011 Webcast
Here is a link to view the recording of my What's New in Revit Architecture 2011 webcast.
What's New in Revit Architecture 2011
Enjoy!
What's New in Revit Architecture 2011
Enjoy!
Friday, April 16, 2010
Release Day for Revit
You can now download the 2011 version of Revit from your subscription site. Get it while it is hot.
Also, don't forget to look at the Subscription Product Enhancements that are available to download.

Inside the Revit Extensions are a couple of new tools. One for converting parameters to Shared Parameters, and one to work with Land XML files on roads and bridges. I have not had a chance to play with either, but they sound promising.
Have Fun!
Monday, March 29, 2010
Revised #1 New Feature in Revit 2011
I know that I listed a tie between my favorite new features in Revit 2011, but I am bumping both of those for another new feature. This one is not that much of a 'wow factor,' but I think it will save time and make documenting your project so much easier.
What is this new found love?
It is the ability to locate tag placement while Tagging By Category. In previous releases, when tags were placed, you either could choose for it to draw a leader to the tag or accept the default location (which was usually right, smack in the middle of the item you were trying to tag). Then you had the tedious process of moving all the tags to a place where they were actually readable. With Revit 2011, when you choose to tag by category, Revit gives you the opportunity to move the tag right after placing the item, before picking the next item to tag. Revit does this without ending the command so you can continue placing tags on additional items.
I believe this will save time and allow users to place tags in the appropriate location so they are all readable. Even with this nice new feature, there is always room for improvement. It would have been nice for Revit to remember where you have place the tag in adjacency to the item being tagged, and automatically put the next tag in the same place for the next item. Oh well, maybe in 2012?
Below is a quick video showing how this works.
What is this new found love?
It is the ability to locate tag placement while Tagging By Category. In previous releases, when tags were placed, you either could choose for it to draw a leader to the tag or accept the default location (which was usually right, smack in the middle of the item you were trying to tag). Then you had the tedious process of moving all the tags to a place where they were actually readable. With Revit 2011, when you choose to tag by category, Revit gives you the opportunity to move the tag right after placing the item, before picking the next item to tag. Revit does this without ending the command so you can continue placing tags on additional items.
I believe this will save time and allow users to place tags in the appropriate location so they are all readable. Even with this nice new feature, there is always room for improvement. It would have been nice for Revit to remember where you have place the tag in adjacency to the item being tagged, and automatically put the next tag in the same place for the next item. Oh well, maybe in 2012?
Below is a quick video showing how this works.
Thursday, March 25, 2010
Revit Architecture 2011 - My Favorite New Features!
Revit Architecture 2011 has many new features. Here are my favorite top 5 new features:
#5 - Sun Path Simulation
Autodesk Revit Architecture 2011 enables you to simulate the sun path, in order to better understand the impact of the sun in relation to your project and its surrounding context. The sun path is a visual representation of the sun's range of movement across the sky at the geographic location you specify for a project. The sun path displays in the context of your project and includes on-screen controls for positioning the sun at any point within its range of movement.
#5 - Sun Path Simulation
Autodesk Revit Architecture 2011 enables you to simulate the sun path, in order to better understand the impact of the sun in relation to your project and its surrounding context. The sun path is a visual representation of the sun's range of movement across the sky at the geographic location you specify for a project. The sun path displays in the context of your project and includes on-screen controls for positioning the sun at any point within its range of movement.
 Along with this you can set the sun settings where changes have been made to how you select your project location. Included in the location dialog is a Google Map interface where you can search for your exact location.
#4 - Realistic View Style
Realistic is a shaded view with ‘live’ rendered materials and textures, including decals. It offers the ability to have a working view that looks almost like a rendering.
 As part of the Graphic Display Options, Revit Architecture now offers an option to use Ambient Lighting (or Ambient Occlusion) in 3d views. Ambient occlusion approximates the way light radiates in real life, especially off what are normally considered non-reflective surfaces.
#3 - Sheet Place Holders
Sheets Lists can now include placeholder sheet rows for sheets that have not yet been created or will never be created in your project, for example, consultants’ sheets. Placeholder sheets can be converted to actual sheets in the project and this conversion can be done as a batch operation.
 #2 - Temporary Dimension Improvements
You now have the ability to control temporary dimension font size and background display (transparent or opaque). Additionally, if temporary dimensions are moved to specific reference elements in the project, those references will be maintained throughout your working session.
 And the #1 new feature...
 A TIE between Floating Properties Palette and Custom Elevation Tags!
The new Properties Palette is “modeless,” so you have constant access to both view and element properties, without having to interrupt your design workflow. The new palette is dockable, resizable and supports multiple monitor configurations.

Elevation tags are now fully customizable and can be designed based on your company standards. They can contain any graphics you want and can align to any number of orientations necessary for your project.

Thursday, May 14, 2009
What's New in Revit Architecture 2010 Recording
If you missed my recent webcast of What's New in Revit Architecture 2010, here is a link to the recording of my webcast. The recording is a little over an hour long.
http://209.16.228.54/webcast/WhatsNewInRevitArchitecture2010.swf
Enjoy!
http://209.16.228.54/webcast/WhatsNewInRevitArchitecture2010.swf
Enjoy!
Friday, April 17, 2009
Space Enhancements in Revit MEP 2010
Revit MEP 2010 has many new features. Here are just a couple when working with Spaces.
Spaces have been enhanced in two major areas. First the ability to create spaces has been improved with the addition of the Place Space Automatically tool. This will allow users to place all the spaces for the entire model with a single click. This is a huge time saver for creating spaces.

Spaces have been enhanced in two major areas. First the ability to create spaces has been improved with the addition of the Place Space Automatically tool. This will allow users to place all the spaces for the entire model with a single click. This is a huge time saver for creating spaces.

The new Place Space Automatically tool.
The second enhancement to spaces is found in the properties. The properties have been improved to give us the ability to further define the space type. The space type has been expanded to include Energy analysis settings. These include the ability to specify an Occupancy Schedule, Lighting Schedule, and Power Schedule. These schedules will dictate usage percentage factors. If the proposed building will be primarily used between the hours of 8:00-5:00, these can be specified and taken into account in analysis.
A custom Occupancy Schedule for a Space type with the hours set for the warehouse hours.
I will try to blog about more new features in Revit MEP 2010 soon.
Thursday, March 12, 2009
Cool New Stuff in Revit Architecture 2010
It's that time of year again! Time to gear up for the new release of the Autdesk products. Revit Architecture 2010 has some nice new features. Here are some of my favorites that have not gotten much publicity. Enjoy!
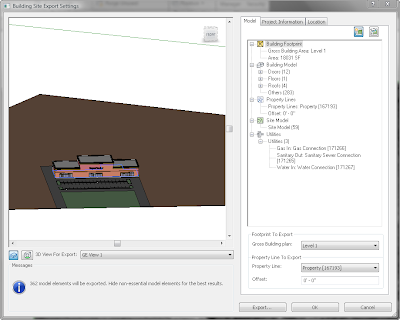
1. Export Building Site Tool - This is a great addition to allow you to export your building site and model to your Civil engineer. It grabs the site, model, building footprint, property lines, and UTILITY Connections and groups them into a new .adsk file format. I especially love the ability to show the Civil engineer where the utility connections are located. Not only that, if they are using Civil 3D 2010, they can actually connect their pipes to our connections.
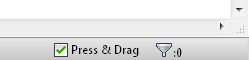
2. The Press & Drag check box on the bottom right corner of the screen. I have always hated how easy it was to accidentally pick and move something inside of Revit without meaning to. Now you can uncheck this check box and you have to first pick the item you want to move before you can move it. This will make my life so much easier!
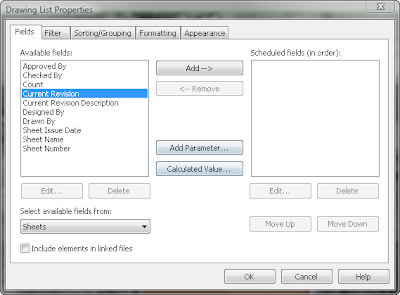
3. The ability to include sheet revisions in a Drawing List. We are no longer limited to just showing revisions on the titleblocks. We now have the ability to add the Current Revision and Current Revision Description to a Drawing List.
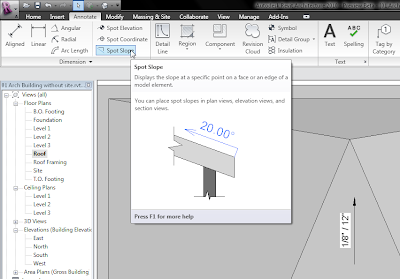
4. The ability to label slopes. This was high on my wish list. I now can call out the slopes on my roofs and floors.
Those are my top 4 non-publicized new features inside of Revit Architecture 2010. More to come soon!
1. Export Building Site Tool - This is a great addition to allow you to export your building site and model to your Civil engineer. It grabs the site, model, building footprint, property lines, and UTILITY Connections and groups them into a new .adsk file format. I especially love the ability to show the Civil engineer where the utility connections are located. Not only that, if they are using Civil 3D 2010, they can actually connect their pipes to our connections.
2. The Press & Drag check box on the bottom right corner of the screen. I have always hated how easy it was to accidentally pick and move something inside of Revit without meaning to. Now you can uncheck this check box and you have to first pick the item you want to move before you can move it. This will make my life so much easier!
3. The ability to include sheet revisions in a Drawing List. We are no longer limited to just showing revisions on the titleblocks. We now have the ability to add the Current Revision and Current Revision Description to a Drawing List.
4. The ability to label slopes. This was high on my wish list. I now can call out the slopes on my roofs and floors.
Those are my top 4 non-publicized new features inside of Revit Architecture 2010. More to come soon!
Thursday, January 08, 2009
Seeing Things Above
Revit has some great tools to help us view a model from many different positions. We can have plans, ceiling plans, elevations, sections, 3d views or 3d sections. This enables us to view what we want when we want to see it.
I get lots of questions concerning the View Range in the View Properties. The View Range will allow you to change your Cut Plane and set your upper and lower limits. This is very helpful, but you need to understand one key rule: Revit will not actually show an item unless the view is cutting through that item.
A floor plan is typically a plan that is looking down and is cut by default 4'-6" above the level line. This means that a light fixture that is 8'-0" above the level line is not being cut by the cut line, which means that the light fixture will not be seen in the floor plan. One of the most common questions I get is "how do I get Revit to show the something on the ceiling on a floor plan?"
Here is a quick fix to be able to show light fixtures in your floor plan. Simply open the light fixture in the Family Editor, and draw a WHITE Model line from the fixture to the level line. This will cause the cutline to cut through the white model line and then show up on the floor plan. It should be white so it will not show up on the screen or on a plot.
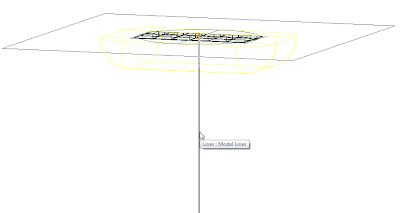
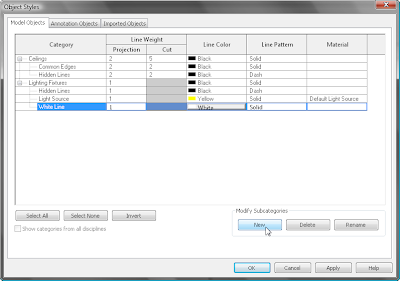
To create the Model line, it works best to draw it in an elevation view. Once it is drawn you will need to create a new subcatagory in the Object Styles under Light Fixtures and assign that catagory to use a white line.
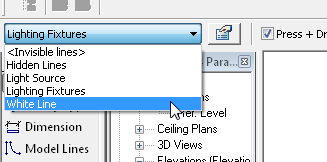
Then you will need to change the line to be assigned to the new sub catagory.
Load the light fixture back into your project and your light fixture now shows up in the floor plan. You may also want to override the graphics of the linework for the light fixture in the floor plan to be a hidden or dashed line.
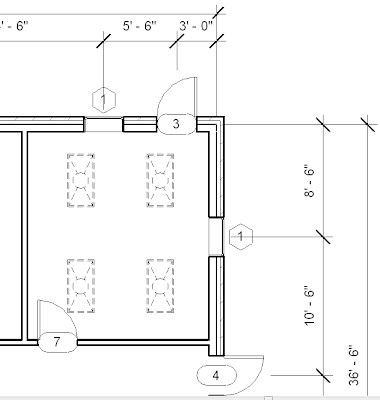
This is a quick and easy way to show items above that are not being cut by the cut plane.
Tuesday, January 06, 2009
Using Schedule Keys in Revit
I have found that one of the most unknown parts of Revit is creating schedule keys. I think creating schedule keys are a great way to promote standards, and provide the information you need on your schedules.
Schedule Keys are nothing more than a schedule of keys that you can use in other schedules. They are associated to a particular catagory and create a paramater for that catagory that can be used in schedules. There are many instances where these could be beneficial. I will give one example to show you how you can begin to use them in your projects.
Let's say you want to create a typical room finish schedule, but it is early on and you are not sure what the actual finishes will be. You do know what the finish material will be but not the actual color or manufacturer. For example, you want to call out CPT-1, or TILE-1 to call out the material as carpet or tile, but you do not know the particular carpet or tile. I am able to create a schedule key for the types of materials and apply them to my room finish schedule, and fill what the actual keys refer to when that information is known.
Schedule Keys are nothing more than a schedule of keys that you can use in other schedules. They are associated to a particular catagory and create a paramater for that catagory that can be used in schedules. There are many instances where these could be beneficial. I will give one example to show you how you can begin to use them in your projects.
Let's say you want to create a typical room finish schedule, but it is early on and you are not sure what the actual finishes will be. You do know what the finish material will be but not the actual color or manufacturer. For example, you want to call out CPT-1, or TILE-1 to call out the material as carpet or tile, but you do not know the particular carpet or tile. I am able to create a schedule key for the types of materials and apply them to my room finish schedule, and fill what the actual keys refer to when that information is known.
Let's begin by creating the schedule key.
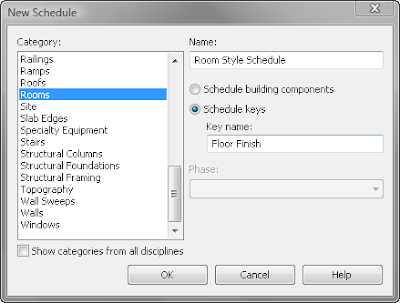
I begin by starting a new Schedule by clicking on Schedule/Quanity from the View tab on the Design Bar. I select Rooms as my catagory since I am creating a key for the room finish. I then select to create a Schedule Key as opposed to a Building Component type of schedule. I also fill in the Key Name as Floor Finish. This is the name of the new parameter that will be added to rooms. I select OK to go to the next step.
I begin by starting a new Schedule by clicking on Schedule/Quanity from the View tab on the Design Bar. I select Rooms as my catagory since I am creating a key for the room finish. I then select to create a Schedule Key as opposed to a Building Component type of schedule. I also fill in the Key Name as Floor Finish. This is the name of the new parameter that will be added to rooms. I select OK to go to the next step.
In the Schedule Properties - Fields Tab, the Key Name is added automatically to the Scheduled Fields column. I need to add one additional field for the manufacturer of the finish. I do this by clicking on Add Parameter and fill in the name Floor Manufacturer.
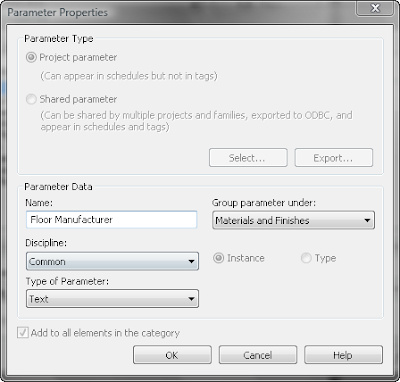
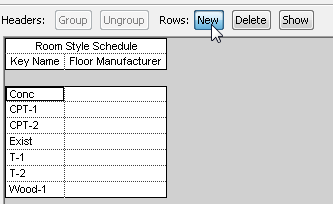
The Key Name and the Floor Manufacturer are the only fields that are needed for the schedule key. Select OK to close the dialog box and to open the schedule key view.
In the schedule key view, you can add new Key Names by clicking the NEW icon on the Options Bar. Create the common finishes that you typically use. Others can be added later, and the manufacturer information can be added at a latter time.
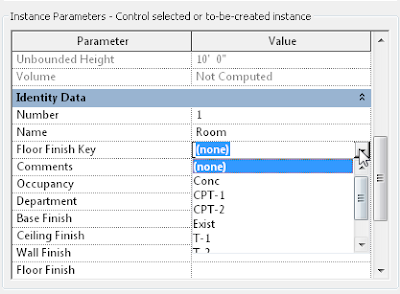
Now when you either go to a Room properties or create a Room Finish Schedule, the Floor Finish key parameter will be listed. You can select what type of floor finish by using the drop down arrow to list the keys that were created in the Schedule Key.
The schedule key can be created in your standard Revit template file and the information can be filled in as it is known. This will create a standard list of finish names to be used in your office.
Schedule Keys are the key to creating consistancy and standards in Revit.
Schedule Keys are the key to creating consistancy and standards in Revit.
Thursday, November 13, 2008
AU Customer Appreciation Mixer
Autodesk University is almost here! I am gearing up for a jam packed week of classes and events. My schedule is crazy this year. I am not sure when I will have a chance to rest, but it will be worth it (I think.)
I will be teaching 3 classes, and assisting as a lab assistant for 2 labs plus attending sessions on Revit and Construction.
Looking at the schedule, it appears that my nights will be just as busy... and I am not the party animal if you do not know me very well.
If you are an Alacad customer, I want to personally invite you to attend a special Customer Appreciation Mixer. Alacad wants to say Thank You for being our customer by hosting a mixer on Monday night at the V Bar from 7:00-8:00. Shoot me an email to ensure that you have your ticket to join us. You must have a ticket to attend.
I am looking forward to meeting many of you that are attending. Find me if you can in the sea of 10,000 attendees. See ya in Vegas!
I will be teaching 3 classes, and assisting as a lab assistant for 2 labs plus attending sessions on Revit and Construction.
Looking at the schedule, it appears that my nights will be just as busy... and I am not the party animal if you do not know me very well.
If you are an Alacad customer, I want to personally invite you to attend a special Customer Appreciation Mixer. Alacad wants to say Thank You for being our customer by hosting a mixer on Monday night at the V Bar from 7:00-8:00. Shoot me an email to ensure that you have your ticket to join us. You must have a ticket to attend.
I am looking forward to meeting many of you that are attending. Find me if you can in the sea of 10,000 attendees. See ya in Vegas!
Friday, October 10, 2008
Enhancing Elevations in Revit
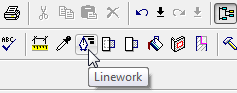
Creating elevations in Revit are as simple as placing a callout. Enhancing the elevations once they are created is another task. Tools like the Linework, Split Face, and Paint help us enhance the elevations. The Linework tool will allow us to change the lineweight of any line in the view, or set it to be invisible if we do not want to see it.
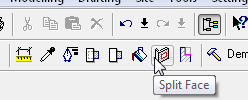
 The Split Face and the Paint tools allow us to split the surface of a wall and apply a different material to that portion of the wall.
These tools are great, but there is nothing built in the program to vary the lineweight automatically based on the depth of view. It would be nice for Revit to allow us to set some depth distances to automatically switch lines that are in the forground to be thick and the lines in the distance to be thin. Maybe some day we will have that.
Another tool that I find handy that few people know about is the Silhouette Edge setting. This setting will allow you to beef up the lineweight of the silhouette edge. This setting is found in the Advance Model Graphics Settings dialog box.
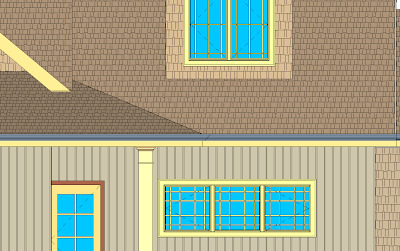
This should give you a head start on enhancing your elevations. You can still use the Linework tool with the Silhouette Edges turned on.
The Split Face and the Paint tools allow us to split the surface of a wall and apply a different material to that portion of the wall. These tools are great, but there is nothing built in the program to vary the lineweight automatically based on the depth of view. It would be nice for Revit to allow us to set some depth distances to automatically switch lines that are in the forground to be thick and the lines in the distance to be thin. Maybe some day we will have that.
Another tool that I find handy that few people know about is the Silhouette Edge setting. This setting will allow you to beef up the lineweight of the silhouette edge. This setting is found in the Advance Model Graphics Settings dialog box.
 Inside the Advance Model Graphics Settings dialog box you can set the silhouette edges to any linetype you have in your project. This will automatically apply this linetype to the outside edges of your view.

Here is a before and after view with the Silhouette Edges changed to Medium Lines.
Silhouette Edge set to None
 Silhouette Edges set to Medium
This should give you a head start on enhancing your elevations. You can still use the Linework tool with the Silhouette Edges turned on.
Monday, September 15, 2008
CADD Camp and AU
For those that are in the Alabama area, do not miss out on this year's CADD Camp in Birmingham on September 30!
We will be hosting a full day of training on Revit. I will also be presenting the basics of NavisWorks during lunch.
Check out the course offerings and sign up at:
http://www.augievents.com/Birmingham/tabid/432/language/en-US/Default.aspx.
This will be like a mini-one-day Autodesk University.
If you are fortunate enough to attend this year's Autodesk Unversity, check out the three classes that I will be presenting.
We will be hosting a full day of training on Revit. I will also be presenting the basics of NavisWorks during lunch.
Check out the course offerings and sign up at:
http://www.augievents.com/Birmingham/tabid/432/language/en-US/Default.aspx.
This will be like a mini-one-day Autodesk University.
If you are fortunate enough to attend this year's Autodesk Unversity, check out the three classes that I will be presenting.
- AB110-6 AutoCAD® Architecture: Making Spaces Work For You!
- CV310-4 From Dirt to Doors: Making AutoCAD® Civil 3D® and Revit® Architecture Work Together In Harmony
- AB404-3 From the Existing to the Beyond with Revit® Design Options and Phases
These are both great opportunities, don't miss out!
Wednesday, May 07, 2008
Seek for Content
There is a new Autodesk website available to search for Revit Content.
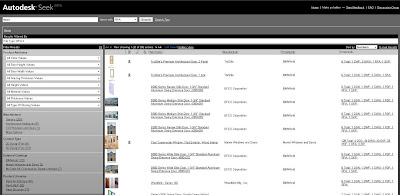
Go to http://seek.autodesk.com/. You can search by keyword, browse by CSI format, and filter it down by manufacturer. It appears to pull from multiple websites. It is a one stop shop for all your content searches.
There is also a built in search line inside of the Revit 2009 products that will launch this site.
Go to http://seek.autodesk.com/. You can search by keyword, browse by CSI format, and filter it down by manufacturer. It appears to pull from multiple websites. It is a one stop shop for all your content searches.
There is also a built in search line inside of the Revit 2009 products that will launch this site.
Wednesday, February 13, 2008
AutoCAD Architecture 2009
AutoCAD Architecture 2009 has some cool new features. I believe users will be excited to see the new enhancements. Here are a few of my favorites.
Wall Endcaps


Now AutoCAD Architecture 2009 makes it easier to create custom wall endcaps. While previous releases had this ability, enhancements to key “grip-edit” functionality makes the process more intuitive and streamlined.
Additionally, it’s easier than ever to modify endcaps using the “Auto-Calculate” feature and the integration of AEC Modify Tools.
Because of this, it’s now possible to extend, trim, and even merge wall components with AutoCAD linework, allowing you to create the endcap condition that you want… in fewer steps!
Match Properties Update
If you’re an AutoCAD user, you are probably aware of the Match Properties feature, commonly referred to as the “Paintbrush tool.”
Now, in AutoCAD Architecture, the “Paintbrush Tool” has been extended beyond AutoCAD entities to also work with AEC objects, such as walls, doors, and windows. The object matching paintbrush will allow users to match the style and graphic properties of one object to like objects in a drawing.
With this update, you’ll be able to quickly make design revisions to linework and objects, so that you don’t have to learn a separate set of revision commands!
Multiline Tags


Another feature around construction documentation is the ability to annotate with multi-line tags.
Now you can have more control over the way text appears in your construction documents by specifying text wrapping, rotation, and alignment in its tags with intuitive grips. With these tools, you’ll find it easier to communicate your design intent clearly.
These are just a few of the improvements. I believe the users will be happy with this release.
Tuesday, February 12, 2008
Welcome to Revit Architecture 2009
It's that time again! Time get excited about what the new features are in the up coming release of Autodesk products. My favorite time of the year!
Revit Architecture 2009 will be here soon. Inside of it will be new features and enhancements that will make your work easier. Here is a sneak peek at a couple of my favorite enhancements.
Dimension Enhancements
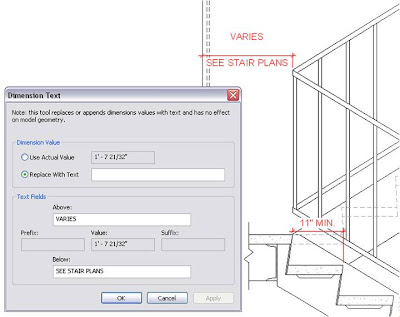
Revit Architecture 2009 makes documenting your designs even easier. With new dimension capabilities, users can dimension to intersections and arc centers. New dimension text formatting enables users to apply common text effects, such as bold, italics, and underline, to their dimension text.
A second new addition to dimensions is the ability to override dimensions with text. While this feature enables users to override dimensions with text such as “Varies, See Stair Plans” or “11” MIN” and thereby achieve new flexibility in their documents, the feature helps to maintain model integrity by disallowing user overrides that misrepresent actual dimensions. For example, users cannot make a 14’ 4” dimension read 14’ 6”.
Revision Enhancements
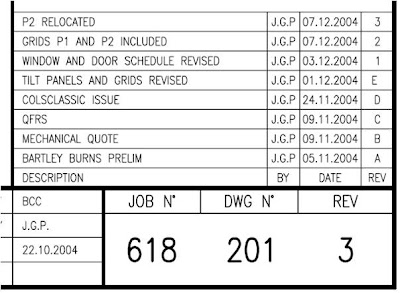
The new revision enhancements allow architects and designers achieve the various revision styles that they demand. New flexibility enables revision tables to build from the bottom up or top down. Also, numbering sequences can include and be sorted by numbers or letters. A new field called “Issued By” helps revision tracking.
New flexibility for revision layouts includes an ability to rotate the schedule on a sheet and to set revision schedules to fixed or variable size.
The added control and flexibility over revisions makes the differing standards in various regions around the world easy to meet.
Pretty cool! More to come soon.
Tuesday, January 29, 2008
Adjusting Door Swings
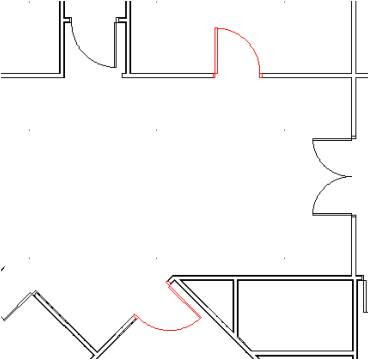
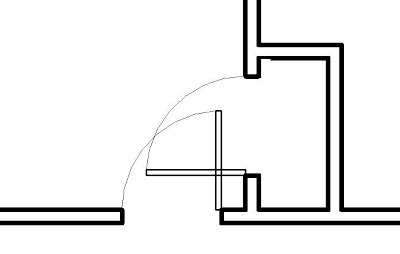
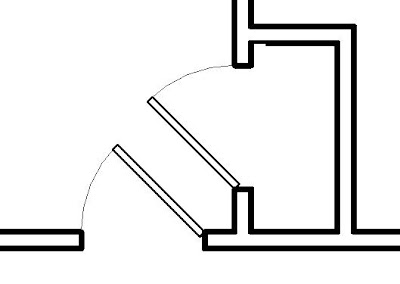
Revit comes with many types of doors that can be used in your projects. You can also download additional types from sites like Revit City and BIM World. Searching through these libraries, I relealized that none of them came with the ability to adjust the swing from 90 degrees to 45 degrees. This is a must in situations as shown below.
 Modifying the plan swing of doors is a simple process, as long as you understand a few things. You will need to open the door family that you want to modify by highlighting the door in your project and then picking the Edit Family button on the Options bar.
This will open up the door family in a Family Editor mode. You will then need to navigate Project Browser to open the floor plan view of the door.

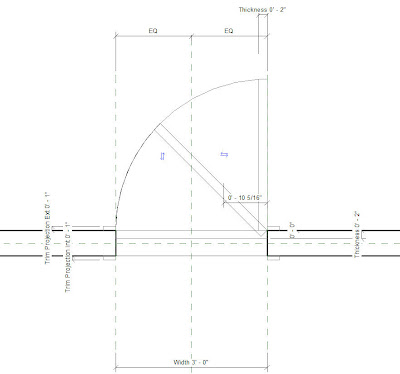
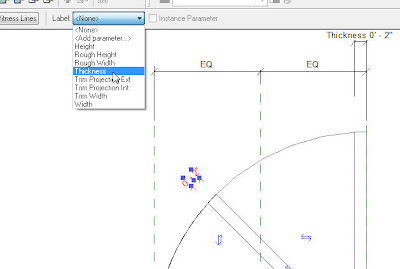
Modifying the plan swing of doors is a simple process, as long as you understand a few things. You will need to open the door family that you want to modify by highlighting the door in your project and then picking the Edit Family button on the Options bar. This will open up the door family in a Family Editor mode. You will then need to navigate Project Browser to open the floor plan view of the door.
Revit uses Symbolic Lines to represent the swing and the door panel in plan views. The actual 3D door panel is not visible in the plan view because we typically want the door panel to be closed in a 3D view or elevation, and we want the door panel to be open in plan views.
To add additional swing angles, simply copy the existing door panel to the desired swing angle. I used the Rotate command with the Copy Option check so it would rotate and copy the panel in one step. Then you will need to copy the swing arc and trim it with the new door panel.
The thickness of the door panel is set to a thickness parameter that users can change. You will need to add a new dimension to the new door panel. Once this dimension is added, assign it to the thickness parameter by using the Label drop down bar on the Options bar.
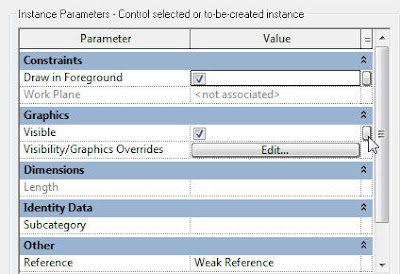
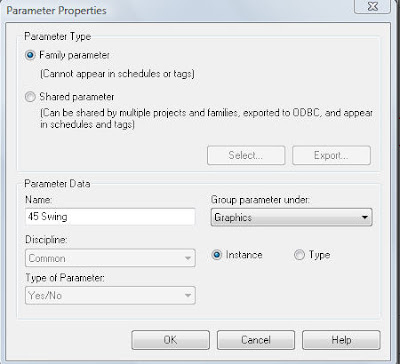
The last step is to set the visibility parameters to allow one swing to be visible and the other swing to be hidden. To do this, you will need to highlight one panel and the corresponding swing arc. Once highlighted, go into the Properties and select the small box at the end of the Visible check box.
This will allow you to set the visibility to a parameter that users can control inside of their projects. Add a new parameter. Provide a name for the parameter that relates to the swing angle. Make the parameter an instant parameter so users can control this instantly as opposed to by type. Choose the group to place this parameter under. Repeat this process for the other door panel and swing arc. In the end, you should have one door panel and swing arc set to one visibility parameter, and the other door panel and swing arc set to another visibility parameter.
Load this door back into your project or save it to your library. Now when you select this door inside of your project, you will have the ability to check the box to show which swing you want to view. The end result is a plan that does not have doors swinging into each other.
Monday, October 29, 2007
Revit MEP Blog
Kyle Bernhardt of Autodesk has started a new Revit MEP blog called Inside the System. Check it out. It already has 3 great videos on creating view filters, and creating systems inside of Revit MEP.
Subscribe to:
Posts (Atom)