If you missed my recent webcast of What's New in Revit Architecture 2010, here is a link to the recording of my webcast. The recording is a little over an hour long.
http://209.16.228.54/webcast/WhatsNewInRevitArchitecture2010.swf
Enjoy!
Thursday, May 14, 2009
Friday, April 17, 2009
Space Enhancements in Revit MEP 2010
Revit MEP 2010 has many new features. Here are just a couple when working with Spaces.
Spaces have been enhanced in two major areas. First the ability to create spaces has been improved with the addition of the Place Space Automatically tool. This will allow users to place all the spaces for the entire model with a single click. This is a huge time saver for creating spaces.

Spaces have been enhanced in two major areas. First the ability to create spaces has been improved with the addition of the Place Space Automatically tool. This will allow users to place all the spaces for the entire model with a single click. This is a huge time saver for creating spaces.

The new Place Space Automatically tool.
The second enhancement to spaces is found in the properties. The properties have been improved to give us the ability to further define the space type. The space type has been expanded to include Energy analysis settings. These include the ability to specify an Occupancy Schedule, Lighting Schedule, and Power Schedule. These schedules will dictate usage percentage factors. If the proposed building will be primarily used between the hours of 8:00-5:00, these can be specified and taken into account in analysis.
A custom Occupancy Schedule for a Space type with the hours set for the warehouse hours.
I will try to blog about more new features in Revit MEP 2010 soon.
Thursday, March 12, 2009
Cool New Stuff in Revit Architecture 2010
It's that time of year again! Time to gear up for the new release of the Autdesk products. Revit Architecture 2010 has some nice new features. Here are some of my favorites that have not gotten much publicity. Enjoy!
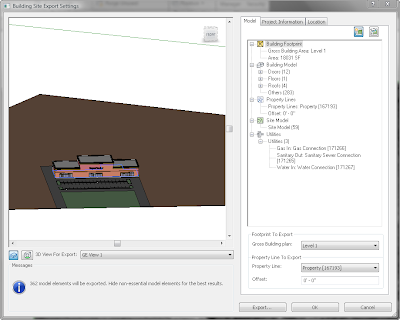
1. Export Building Site Tool - This is a great addition to allow you to export your building site and model to your Civil engineer. It grabs the site, model, building footprint, property lines, and UTILITY Connections and groups them into a new .adsk file format. I especially love the ability to show the Civil engineer where the utility connections are located. Not only that, if they are using Civil 3D 2010, they can actually connect their pipes to our connections.
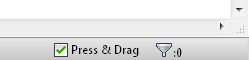
2. The Press & Drag check box on the bottom right corner of the screen. I have always hated how easy it was to accidentally pick and move something inside of Revit without meaning to. Now you can uncheck this check box and you have to first pick the item you want to move before you can move it. This will make my life so much easier!
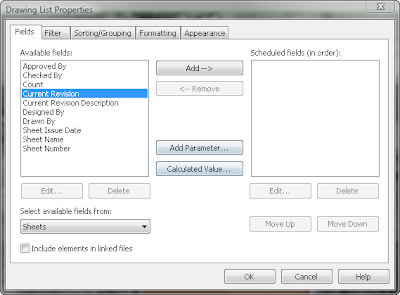
3. The ability to include sheet revisions in a Drawing List. We are no longer limited to just showing revisions on the titleblocks. We now have the ability to add the Current Revision and Current Revision Description to a Drawing List.
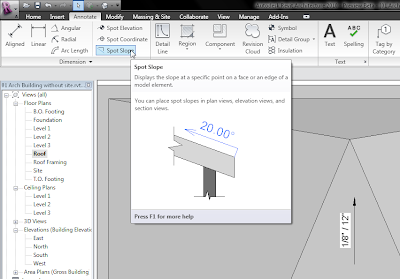
4. The ability to label slopes. This was high on my wish list. I now can call out the slopes on my roofs and floors.
Those are my top 4 non-publicized new features inside of Revit Architecture 2010. More to come soon!
1. Export Building Site Tool - This is a great addition to allow you to export your building site and model to your Civil engineer. It grabs the site, model, building footprint, property lines, and UTILITY Connections and groups them into a new .adsk file format. I especially love the ability to show the Civil engineer where the utility connections are located. Not only that, if they are using Civil 3D 2010, they can actually connect their pipes to our connections.
2. The Press & Drag check box on the bottom right corner of the screen. I have always hated how easy it was to accidentally pick and move something inside of Revit without meaning to. Now you can uncheck this check box and you have to first pick the item you want to move before you can move it. This will make my life so much easier!
3. The ability to include sheet revisions in a Drawing List. We are no longer limited to just showing revisions on the titleblocks. We now have the ability to add the Current Revision and Current Revision Description to a Drawing List.
4. The ability to label slopes. This was high on my wish list. I now can call out the slopes on my roofs and floors.
Those are my top 4 non-publicized new features inside of Revit Architecture 2010. More to come soon!
Thursday, January 08, 2009
Seeing Things Above
Revit has some great tools to help us view a model from many different positions. We can have plans, ceiling plans, elevations, sections, 3d views or 3d sections. This enables us to view what we want when we want to see it.
I get lots of questions concerning the View Range in the View Properties. The View Range will allow you to change your Cut Plane and set your upper and lower limits. This is very helpful, but you need to understand one key rule: Revit will not actually show an item unless the view is cutting through that item.
A floor plan is typically a plan that is looking down and is cut by default 4'-6" above the level line. This means that a light fixture that is 8'-0" above the level line is not being cut by the cut line, which means that the light fixture will not be seen in the floor plan. One of the most common questions I get is "how do I get Revit to show the something on the ceiling on a floor plan?"
Here is a quick fix to be able to show light fixtures in your floor plan. Simply open the light fixture in the Family Editor, and draw a WHITE Model line from the fixture to the level line. This will cause the cutline to cut through the white model line and then show up on the floor plan. It should be white so it will not show up on the screen or on a plot.
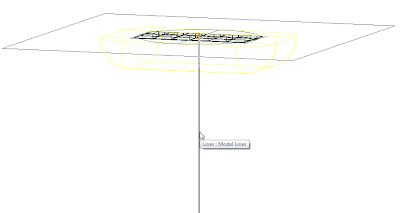
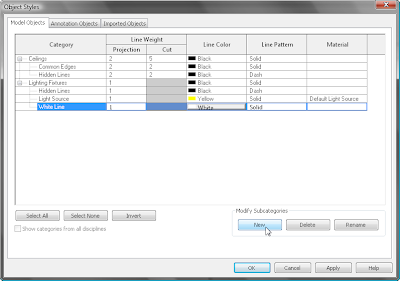
To create the Model line, it works best to draw it in an elevation view. Once it is drawn you will need to create a new subcatagory in the Object Styles under Light Fixtures and assign that catagory to use a white line.
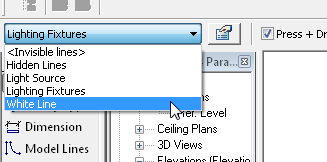
Then you will need to change the line to be assigned to the new sub catagory.
Load the light fixture back into your project and your light fixture now shows up in the floor plan. You may also want to override the graphics of the linework for the light fixture in the floor plan to be a hidden or dashed line.
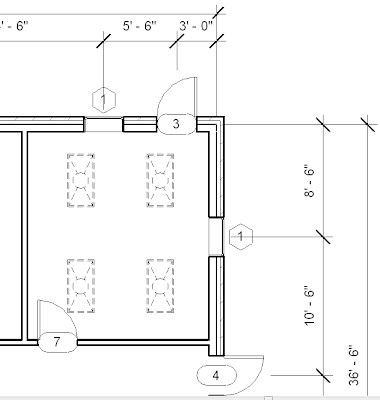
This is a quick and easy way to show items above that are not being cut by the cut plane.
Tuesday, January 06, 2009
Using Schedule Keys in Revit
I have found that one of the most unknown parts of Revit is creating schedule keys. I think creating schedule keys are a great way to promote standards, and provide the information you need on your schedules.
Schedule Keys are nothing more than a schedule of keys that you can use in other schedules. They are associated to a particular catagory and create a paramater for that catagory that can be used in schedules. There are many instances where these could be beneficial. I will give one example to show you how you can begin to use them in your projects.
Let's say you want to create a typical room finish schedule, but it is early on and you are not sure what the actual finishes will be. You do know what the finish material will be but not the actual color or manufacturer. For example, you want to call out CPT-1, or TILE-1 to call out the material as carpet or tile, but you do not know the particular carpet or tile. I am able to create a schedule key for the types of materials and apply them to my room finish schedule, and fill what the actual keys refer to when that information is known.
Let's begin by creating the schedule key.
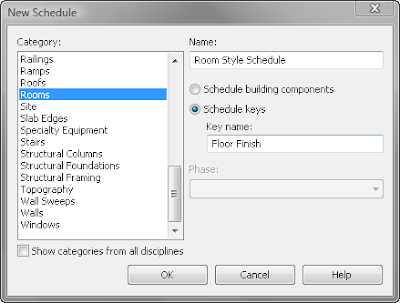
I begin by starting a new Schedule by clicking on Schedule/Quanity from the View tab on the Design Bar. I select Rooms as my catagory since I am creating a key for the room finish. I then select to create a Schedule Key as opposed to a Building Component type of schedule. I also fill in the Key Name as Floor Finish. This is the name of the new parameter that will be added to rooms. I select OK to go to the next step.
I begin by starting a new Schedule by clicking on Schedule/Quanity from the View tab on the Design Bar. I select Rooms as my catagory since I am creating a key for the room finish. I then select to create a Schedule Key as opposed to a Building Component type of schedule. I also fill in the Key Name as Floor Finish. This is the name of the new parameter that will be added to rooms. I select OK to go to the next step.
In the Schedule Properties - Fields Tab, the Key Name is added automatically to the Scheduled Fields column. I need to add one additional field for the manufacturer of the finish. I do this by clicking on Add Parameter and fill in the name Floor Manufacturer.
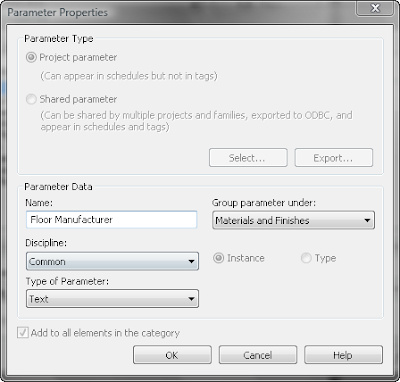
The Key Name and the Floor Manufacturer are the only fields that are needed for the schedule key. Select OK to close the dialog box and to open the schedule key view.
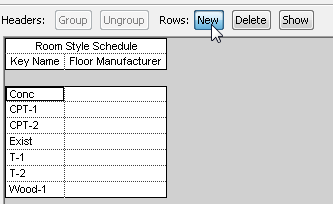
In the schedule key view, you can add new Key Names by clicking the NEW icon on the Options Bar. Create the common finishes that you typically use. Others can be added later, and the manufacturer information can be added at a latter time.
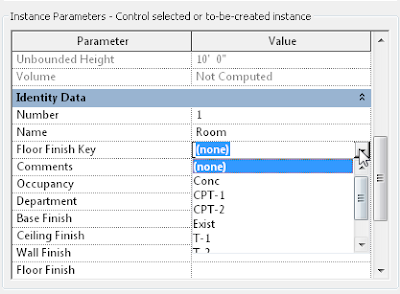
Now when you either go to a Room properties or create a Room Finish Schedule, the Floor Finish key parameter will be listed. You can select what type of floor finish by using the drop down arrow to list the keys that were created in the Schedule Key.
The schedule key can be created in your standard Revit template file and the information can be filled in as it is known. This will create a standard list of finish names to be used in your office.
Schedule Keys are the key to creating consistancy and standards in Revit.
Schedule Keys are the key to creating consistancy and standards in Revit.
Subscribe to:
Posts (Atom)